Someone says “pose,” and you lock up. You square your shoulders to the lens, pin your arms to your sides, plant both feet, and freeze a smile in place. The photo comes back looking like a mugshot, so you decide you’re just awkward in pictures. You aren’t. Posing well is three small body moves anyone can make in the half-second before the shot, and the trick is to pose looser, not harder.
People who photograph well in full-body shots rarely have better bodies than you. They have a few habits that keep them from going stiff. Those habits are learnable, and there are only three that carry most of the weight: angle your body off-square, put space between your arm and your torso, and stand with your weight on your back foot.
These moves are for when you are in front of the lens. When you are behind it, talking someone else through the same loosening is its own skill, and that is how to take good photos of people.
Fundamental 1: Angle your body off-square
The instinct when a camera comes up is to turn and face it head-on. That square, straight-on stance is the single most common posing mistake, and it works against you twice. It shows the camera your full width, and it reads as flat and a little confrontational, like a passport photo.
The fix is to turn. Rotate your body about 45 degrees away from the camera, then bring your face back toward the lens. That diagonal does two things at once: it narrows your silhouette, because the camera now sees you side-on instead of full-width, and it adds dimension, because your shoulders and hips form a line instead of a wall. Photographers turn nearly every subject this way for a reason. It flatters almost everybody.
There’s also a “good side,” and it’s usually the left. Psychologist Annukka Lindell, in a 2017 La Trobe University study that coded 2,000 Instagram selfies, found 41% of people lead with their left cheek, more than any other pose, and that viewers read left-cheek poses as warmer and more emotionally expressive. Painters worked this out centuries ago. When you turn off-square, turn so your left cheek leads.
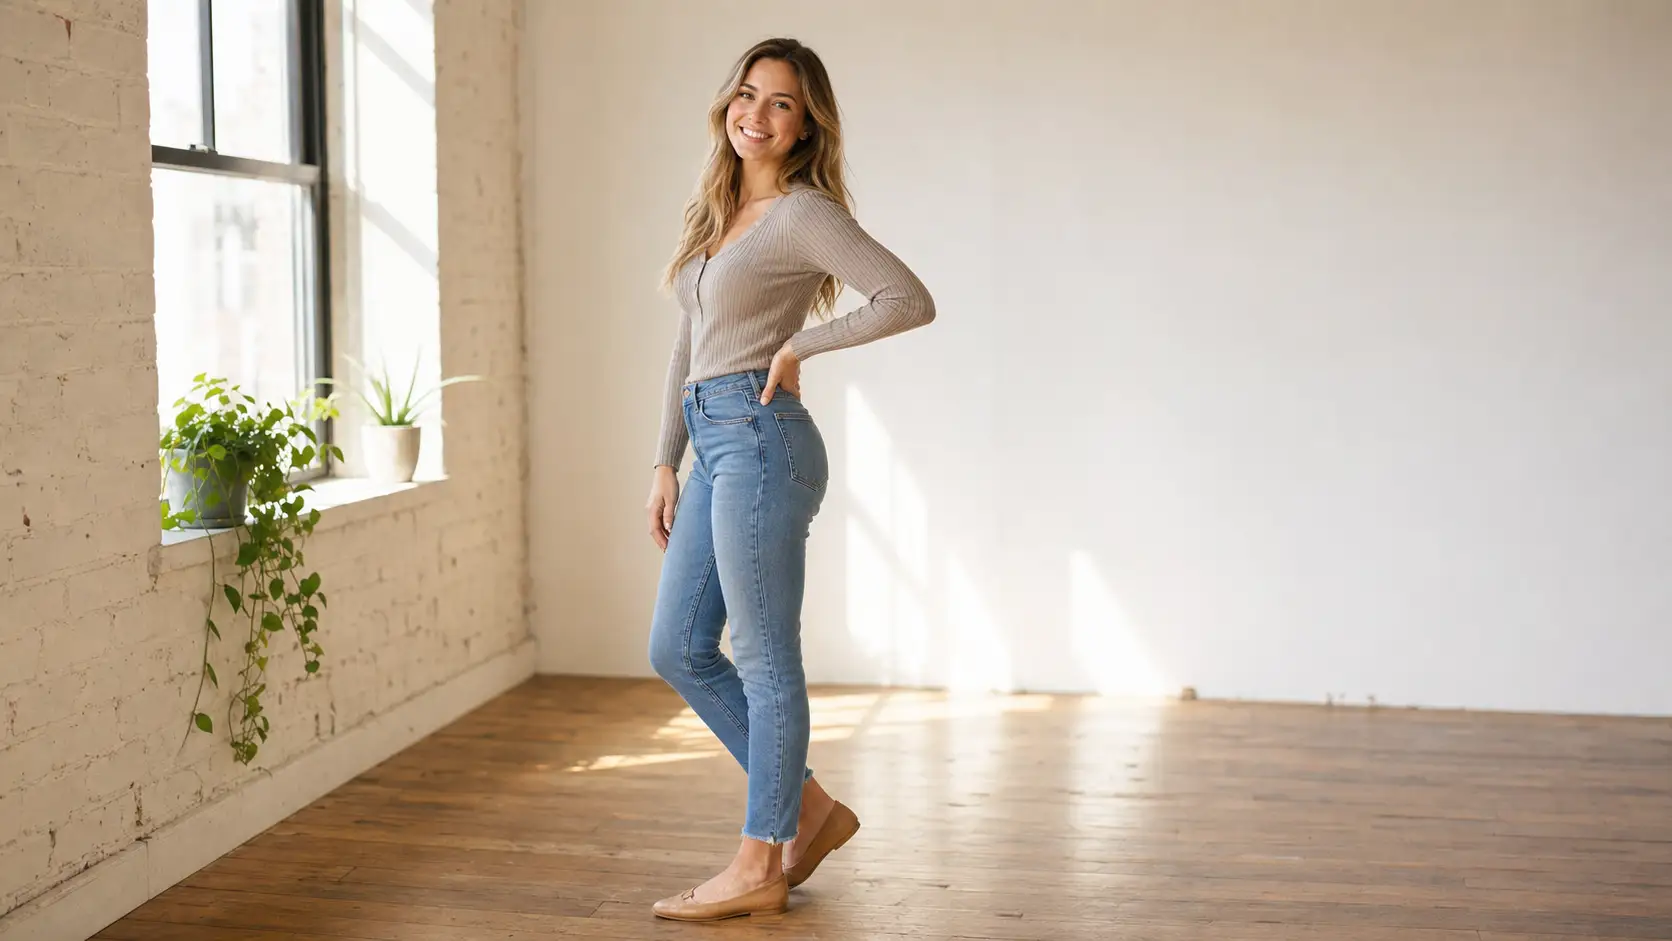
Here is the whole change in one image. Same person, same outfit, same light, two seconds apart.


Off-square is fundamental one, and it fixes more “I look wide in photos” complaints than any diet ever will.
Fundamental 2: Put space between your arm and your torso
This is the real answer to the question everyone asks: what do I do with my hands?
The problem is almost never the hands. It’s the arms. When you let your arms hang straight and pressed against your sides, the upper arm flattens against your body and the two merge into one solid block. You look wider than you are, and your waist disappears. Then the hands, with nothing to do, dangle at the bottom of that block and feel impossible to place. So you start the awkward cycle: cross them, hide them, fidget.
Break the merge. Put a small gap between your arm and your torso, and the hands solve themselves. A hand resting on your hip opens a triangle of space and snaps your waistline back into view. A thumb hooked in a pocket does the same with less effort. Holding something, a cup or a bag or a railing, gives your hands an honest job. Even a soft bend at the elbow, arm slightly away from the body, is enough. The rule is one line: keep your arm off your side and your hands occupied.
The arm-gap is fundamental two, and it’s the quiet cure for the “I don’t know what to do with my hands” panic.
Fundamental 3: Put your weight on your back foot
Stand the way you normally stand for a photo and you’ll plant both feet flat, weight even, locked. It feels stable. It looks stiff, and it spreads your stance to its widest.
The move is to shift your weight onto your back foot, the one farther from the camera. That single change cascades: your front knee relaxes, your front hip drops, and your body settles into a gentle S-curve instead of a straight plank. Sculptors have leaned on this for two thousand years. They call it contrapposto, weight on one leg so the body curves naturally, and it’s the difference between a statue that looks alive and one that looks like a board. As a bonus, shifting your weight back also pushes your hips a little farther from the lens, and in a camera, farther means smaller.
You don’t have to exaggerate it. A subtle lean is enough. The goal is to look like you’re standing easy, not bracing for impact.
Back-foot weight is fundamental three, and it’s the line between standing in a photo and posing in one without looking like you’re trying.
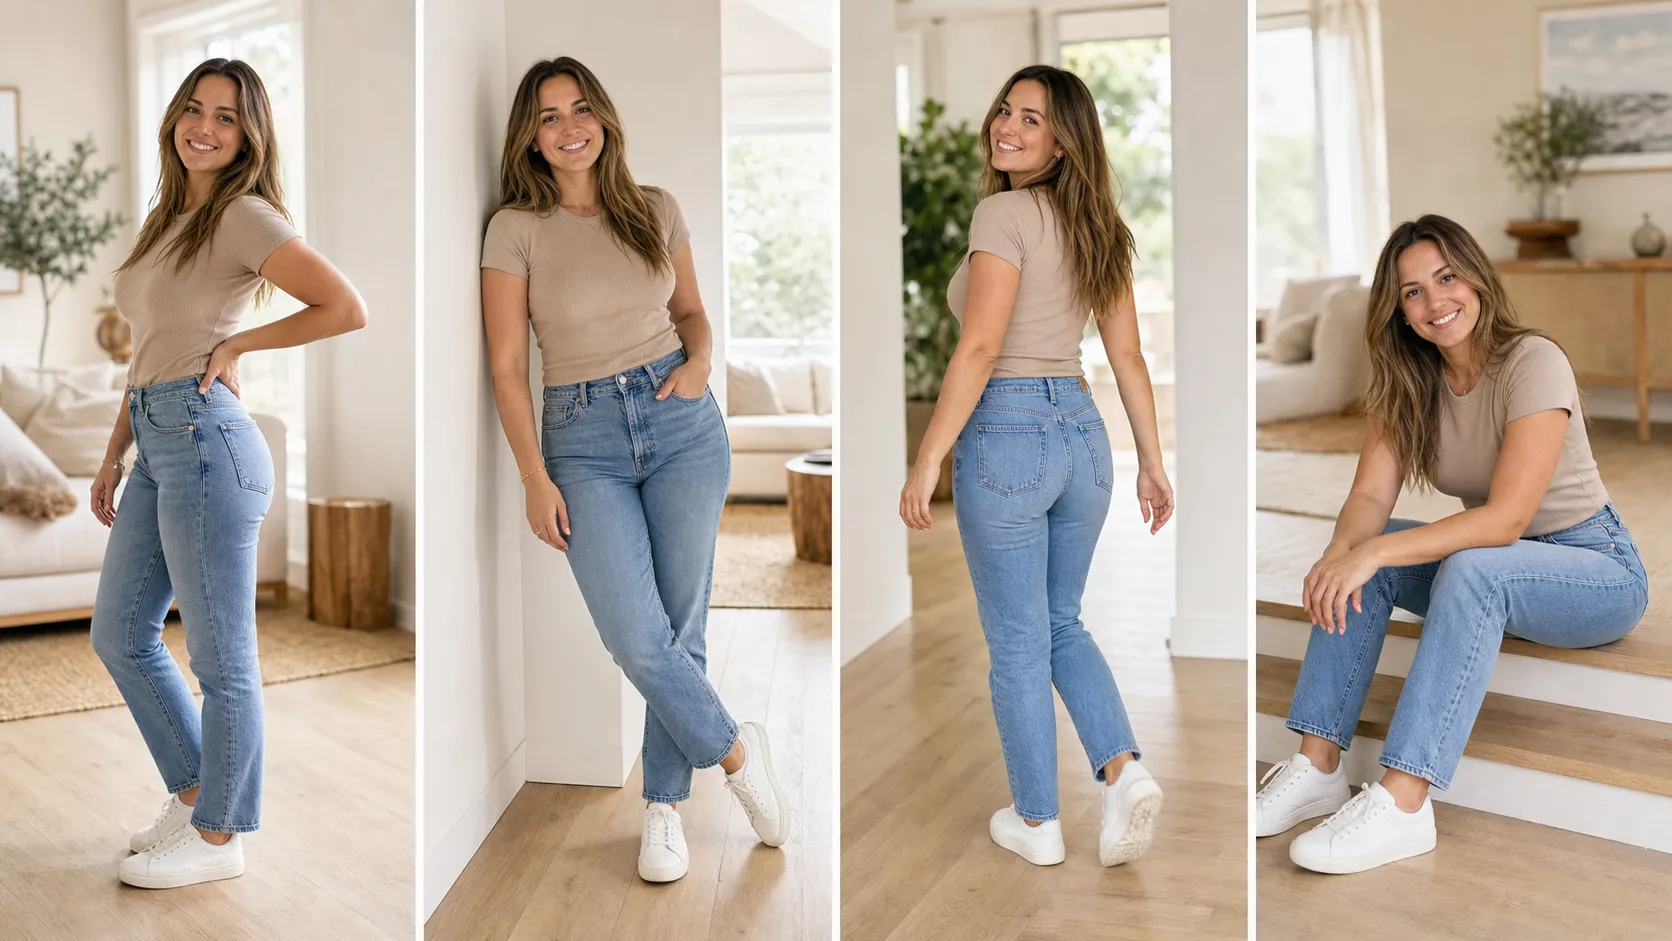
Here are the three fundamentals worn into a few everyday poses. Same woman, same room, different ways to stand easy.
One paste-ready AI move a week, the kind you can use on a Tuesday or a Sunday, plus our free Independent Brand Visual Kit the moment you join. Subscribe to the newsletter.
Don’t forget the face
A flattering body under a tucked chin still looks off, so spend one second on the head. The instinct in front of a camera is to pull your head back, which stacks your neck and softens your jaw. Do the opposite. Push your forehead slightly toward the camera and down. Photographer Peter Hurley tells subjects to bring the forehead toward the camera, and it works because extending the forehead pulls the skin taut along your jaw and defines it. Photographers nicknamed it the turtle. It feels strange and looks right.
Keep the camera at or slightly above eye level while you’re at it. A low, close camera distorts your face: a 2018 study in JAMA Facial Plastic Surgery, led by Rutgers surgeon Boris Paskhover, measured a roughly 30% wider nasal base in a photo taken at about 12 inches versus one shot from five feet. The body work and the face work are the same idea, applied to different parts of you. For the full breakdown of the face, the three photogenic levers cover angle, light, and expression, and the smile itself goes deeper in how to smile in photos.
The shortcut, for when you want a sure thing
The three fundamentals fix the photos you take from here on. But sometimes you want a wall-worthy full-body shot today and the moment won’t come back. That’s what an AI photoshoot is for: upload one clear photo of yourself, and it rebuilds the pose, the framing, and the setting into a polished portrait while keeping your real face and body. It applies the fundamentals for you, when practicing them later isn’t an option.
You can try the idea for free right now. Paste the prompt below into ChatGPT or Gemini with one clear full-length photo of yourself, and it re-poses you using the same three fundamentals. It’s written to keep your real face and build a believable everyday photo, not a glossy studio one.
The natural-pose prompt, copy and pasteTap to expand
Use the attached photo of me as a face-and-body identity reference only. Keep my real face, body shape, skin tone, hair, and clothing clearly recognizable. Re-render the same person in a natural, true-to-life everyday full-length photo with a flattering relaxed pose: body turned about 45 degrees off the camera with my face back toward the lens, one hand resting easily on my hip so there is a clear gap between my arm and my torso, and my weight on my back foot so my front hip drops into a relaxed stance. Camera at eye level or slightly above, genuine soft smile, soft natural daylight. Keep it believable and candid, not glamorous, retouched, or studio-styled. Keep the same kind of casual clothing and setting, and only improve the pose, framing, and light. Photoreal, with natural skin texture and no heavy smoothing.
If you’d rather see the range first, the looks are in AI photoshoot ideas. And if you want to understand why your photos feel “off” before you even pose, that goes deeper in why you look bad in photos.
FAQ
Q: What is the most flattering way to pose for pictures?
A: Turn your body about 45 degrees off the camera instead of facing it square, put a little space between your arm and your torso with a hand on your hip or in a pocket, and shift your weight onto your back foot. Those three moves slim and relax almost any body in almost any photo, and you can do all three in two seconds.
Q: What are the 7 posing points?
A: It’s a coaching mnemonic, not a law. Different photographers run their own list of body parts to check before the shot, usually some mix of head, shoulders, hands, hips, legs, feet, and spine. The number floats between five and eight depending on who’s teaching. You don’t need to memorize a list. The three fundamentals here cover the parts that change a photo most: your body angle, your arms, and your weight.
Q: How to pose for pictures for a female over 50?
A: The same three fundamentals, with the dial turned toward soft and relaxed. Angle off-square so you’re not flat to the lens, keep a clear gap between your arm and your body to define your waist, and put your weight on your back foot for an easy stance. Push your forehead slightly toward the camera to keep the jawline crisp, and favor soft front light. The goal isn’t to look younger. It’s to look like you on a good day.
Q: What is the 80/20 rule in photography?
A: It’s the Pareto principle, not a posing trick. In portraits it’s usually stated as 80% psychology and 20% technical, a framing the portrait photographer Joe Edelman is known for: most of a good photo comes from the subject feeling relaxed, not from the gear. For you, that means the posing moves matter less than not bracing up. Loosen first, then place your body.
Q: What should I do with my hands when posing?
A: Give them a job and keep them off your sides. A hand on your hip, a thumb in a pocket, holding a cup, or a soft bend at the elbow all do the same thing: they put space between your arm and your torso so the two don’t merge into one wide block. Idle arms pressed flat are what make hands feel awkward in the first place.
Key Takeaways
- Posing well means posing looser, not harder. Three body moves carry most of it: angle off-square, arm-gap, weight on your back foot.
- Angle: turn your body about 45 degrees off the camera and bring your face back. Square-to-the-lens shows your full width and reads flat. Lead with your left cheek, which a 2017 La Trobe study found reads as more expressive.
- Arms: put a gap between your arm and your torso with a hand on a hip or in a pocket. This is the real answer to “what do I do with my hands.”
- Weight: shift onto your back foot for a relaxed S-curve that also pushes your hips back from the lens.
- For a guaranteed-good full-body shot you can’t reshoot, an AI photoshoot applies the same fundamentals from one photo while keeping your real face and body.
- Want specific poses to copy, not just the principles? See photo poses and ideas, grouped by situation.
- Shooting solo, with no one to hold the camera? How to take good photos of yourself covers the setups that make posing work when it’s just you.
So which one first?
Most people try to pose harder, stiffening every part of the body at once, when the whole skill is the opposite. Next time someone lifts a phone, do one thing: turn off-square. Then add the arm-gap, then the back foot. Three small moves, in order.
Which of the three have you been skipping?