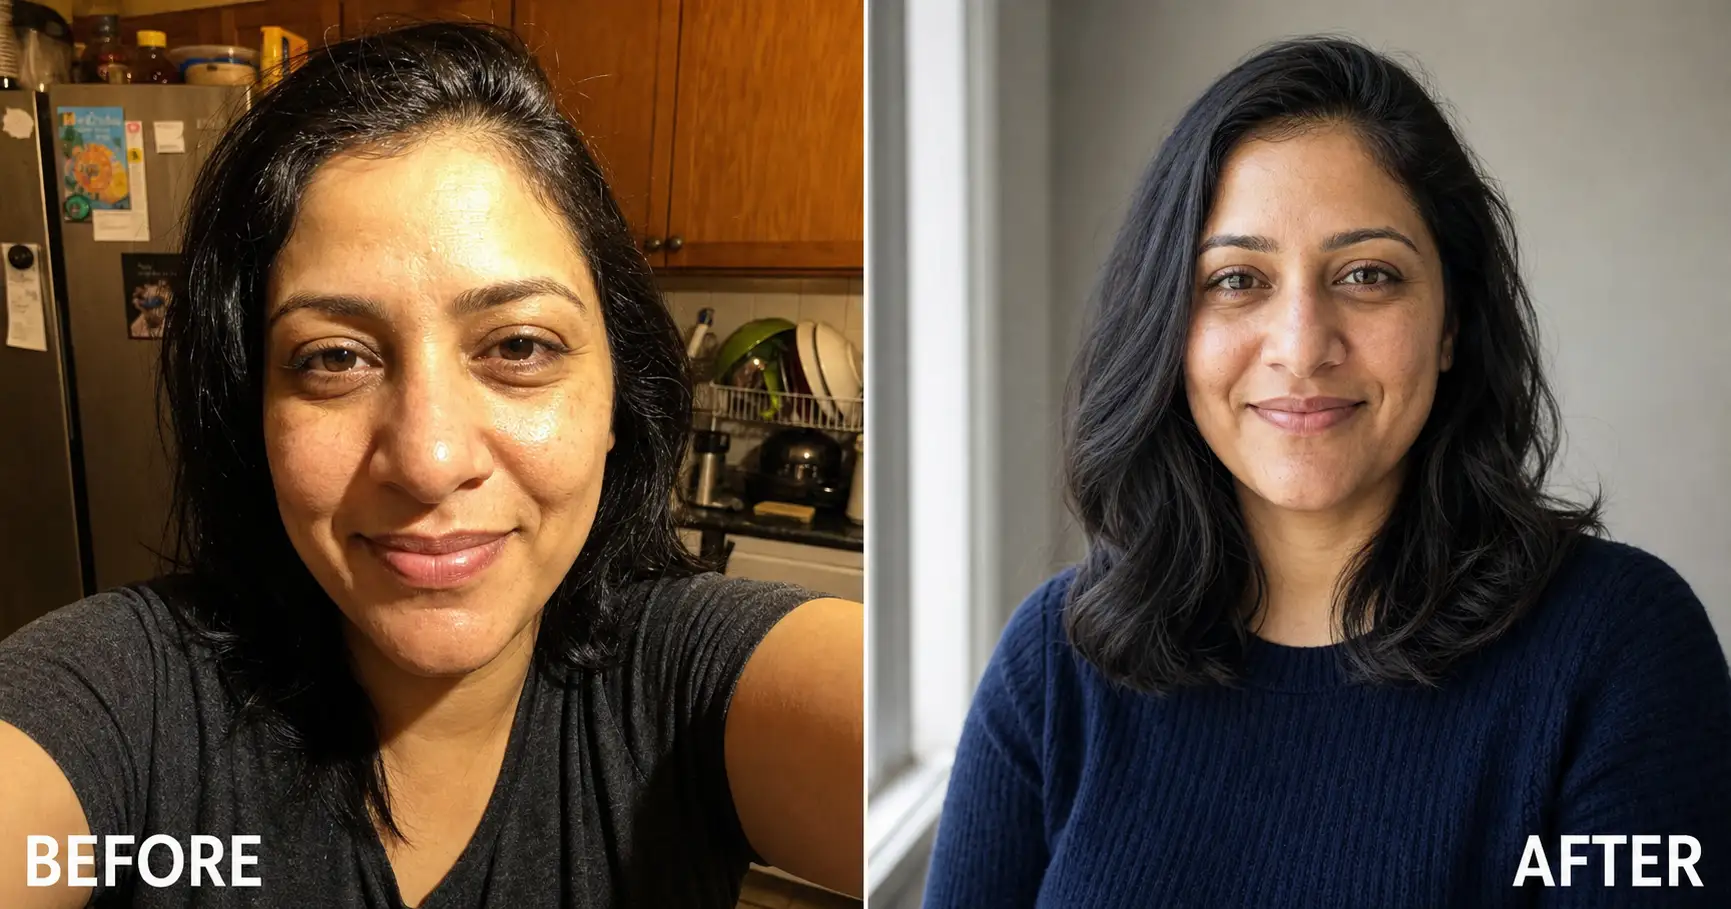
Yes, you can take a professional headshot at home, and it does not require a photographer or a single piece of new gear. A studio shot is buying four things: soft directional light, a clean wall, the right distance between your face and the lens, and someone telling you to fix your chin. Three of those are free in your living room. This is how to stage them, and how to close the one gap that is left.
What the $300 was actually buying
A stranger sizes up your profile photo in the time it takes to scroll past it, and the picture answers one question before you say a word: did this person take themselves seriously? A shot cropped from a wedding or grabbed off a webcam answers it wrong. It tells the viewer you didn’t think this mattered.
So people book a studio. According to Thumbtack’s 2025 price guide, the average professional headshot session in the US runs $304, with most falling between $216 and $427. HeadshotPro’s 2025 analysis of hundreds of photographer sites put the median closer to $250. Either way, it’s a real bill and a week of scheduling for one picture.
Here is the part nobody tells you. That fee is not buying talent. It is buying four specific variables, and only one of them needs a human in the room.
The photographer is selling you soft directional light, a clean backdrop, the right distance between your face and the lens, and a director who tells you to drop your shoulders and tilt your chin. The light, the wall, and the distance are physics. You can stage all three at home with the phone already in your pocket. The director is the only thing that doesn’t fit in your living room, and even that has a workaround.
Which means the at-home headshot isn’t a downgrade. It’s the same four variables, staged for free in a room you already pay rent on.
The five-minute window-light setup
Get four things right and your photo already beats nine in ten of the pictures on LinkedIn. LinkedIn’s own data is blunt about why it matters: a profile with any photo at all gets up to 21 times more profile views than one without. The bar is not “studio.” The bar is “looks like you cared.” Here is the setup.
Step 1: Face a window, never a ceiling
Stand facing a large window with soft, indirect daylight. No direct sun. Turn your face about thirty degrees off the glass so the light rakes across one side and gives your face shape.
You’ll see the difference instantly: soft light wrapping your face, no hard shadows. The pitfall is the ceiling bulb. Overhead light digs dark pits under your eyes and nose, which is exactly what every bad selfie has in common. Turn the overhead light off and let the window do the work.
Step 2: Step back, then zoom
Prop the phone at eye level and stand about five feet back. Use the 2x or 3x lens, not the wide one, and let it crop in.
This is the step that separates a headshot from a selfie. A study in JAMA Facial Plastic Surgery, titled “Nasal Distortion in Short-Distance Photographs: The Selfie Effect,” found that a photo taken from twelve inches away makes the base of your nose look about 30 percent wider than the same face shot from five feet. Arm’s length is twelve inches. Five feet is a headshot. The pitfall is trusting the front camera at arm’s length; it is built to enlarge your nose.
Step 3: Put a plain wall behind you
Stand two to three feet in front of a plain wall. The gap lets the wall fall softly out of focus instead of reading as “I shot this in my hallway.”
A quiet wall keeps your face the only thing the scanner’s eye lands on. The pitfall is the bookshelf, the bed, or the kitchen behind you; a busy background pulls the glance away from the one thing it’s supposed to read. The wall is the free version of a studio backdrop.
Step 4: Take thirty, keep three
Set a three-second timer and shoot thirty frames across small changes: chin down a touch, shoulders dropped, a real half-smile, then a calm closed mouth. You are doing the director’s job in volume. The full set of moves a director would call — where to put your weight, what to do with your chin and shoulders — is how to pose for pictures.
You’ll know it worked when three of the thirty make you look like the version of yourself that shows up rested. The pitfall is taking four shots and settling. The studio director earns part of that $300 by making you take forty; you can take forty for free.
What to wear and where to stand
Two of your choices are free and they move the photo more than any lens would: the color you wear and the wall you pick. Both are doing the same job, which is to stay quiet so your face carries the read.
For wardrobe, pick one solid mid-tone color and skip the busy pattern. A loud print or a logo competes with your face for the glance; a calm navy, charcoal, or deep green lets the face win. The deeper question, which color actually flatters your skin tone and reads right for your field, has its own answer; that’s the whole subject of what color to wear for a professional headshot. For the job-by-job version, LinkedIn headshot examples sorted by profession shows what each field is pattern-matching for.
For the background, quiet beats clever. A plain wall a few feet behind you is the safe default, and if your only walls are busy, you can fix or swap the backdrop after the fact; that’s covered in how to pick and fix a professional headshot background.
These two choices cost nothing, and they swing the photo more than any gear upgrade would, which is exactly why each one earns its own deep dive.
The rules also shift with the job the headshot has to do. A casting director and a recruiter want opposite things, so an acting headshot plays by its own rules. And the very same window-and-phone setup, framed tighter and lit flatter against a plain wall, is all you need for a compliant passport photo at home.
One short, paste-ready AI move lands in your inbox every week, and the moment you sign up you get the Independent Brand Visual Kit: twelve copy-ready prompts covering founder portraits, LinkedIn headshots, listing photos, and more. Subscribe to the newsletter.
Closing the last gap
Run the four steps and you have a genuinely good photo. But the phone has a ceiling. Its lens flattens depth, home light is rarely as even as a softbox, and there is no director catching the moment your shoulders creep up. This is the gap between “good for a phone” and “looks like a pro shot it.”
The fix is to upload your best frame to an AI image tool and let an identity-locked prompt supply the studio finish: the soft directional key light, the 85mm-style perspective, and the real skin texture the phone couldn’t hold. The trap is that a lazy prompt does the opposite. It hands you a waxy, porcelain stranger who is almost you. The reasons that happens, and how the fix works, are laid out in why AI images look fake and the anti-plastic method; the short version is that the prompt has to lock your face first and force your real pores back in.
This is the result that combination produces from a single home frame.
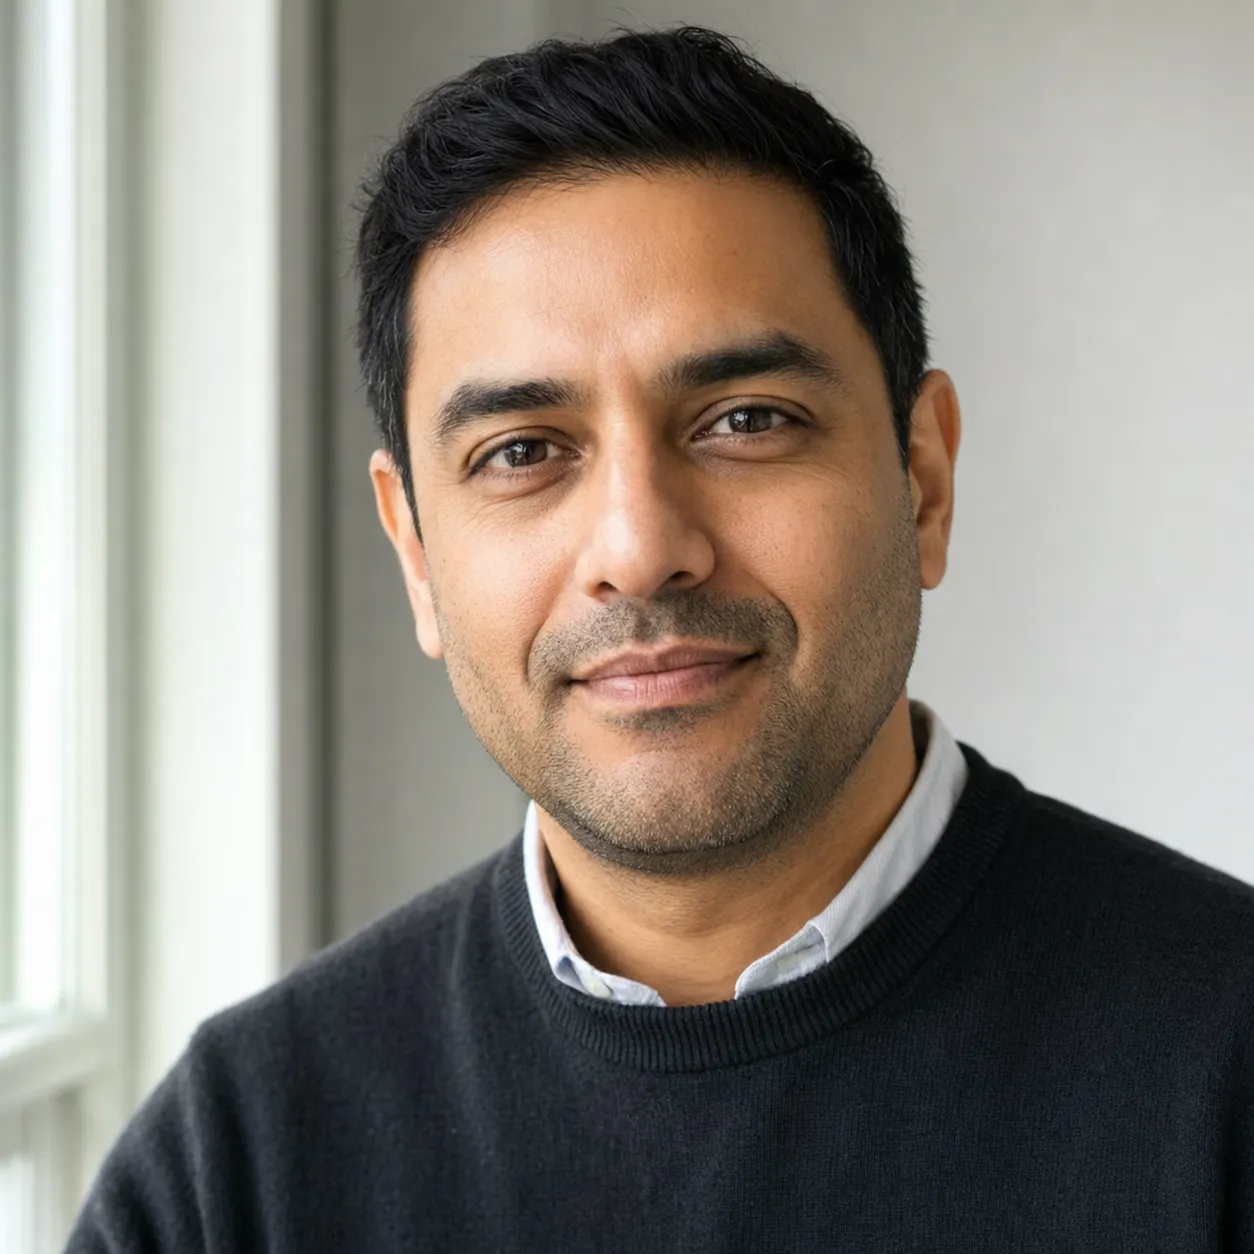
Here is the prompt that does it. Upload your best window-light frame first, then paste this; it locks the studio light, the lens, and your real skin texture onto the face that’s already yours.
Show the full promptTap to expand
Paste this into your AI (ChatGPT, Claude, Gemini, or any image tool).
REQUIRED upload before pasting: one clear, well-lit front-facing photo of yourself. That is the face the AI keeps faithful; without it, the headshot will not look like you.
Two slots are yours to swap: {OUTFIT_STYLE} and {BACKGROUND_STYLE}.
Generate this image:
A single photoreal 1:1 square professional headshot of the person in the uploaded reference image, chest-up framing, eyes meeting the camera with a calm relaxed natural closed-mouth smile, wearing {OUTFIT_STYLE}, lit by soft diffused daylight from the camera-left as if from a large window, against {BACKGROUND_STYLE}. The light has a soft even quality with gentle highlight roll-off on the lit side and a soft natural fill on the shadow side, low contrast, shallow depth of field, 85mm lens equivalent at f/2.8 for a flattering shoulders-up perspective, sharp focus on the eyes. The person’s face, bone structure, eye shape, nose, lips, hairline, and skin tone match the uploaded reference exactly so this is unmistakably the same person. Realistic skin texture preserved exactly as in the uploaded reference: visible pores, faint natural skin variation, light freckles or marks if present, no airbrushing, no porcelain smoothing, no waxy AI-plastic finish. The mood is grounded, approachable, and modern-professional; the headshot reads “shot by a pro,” not “cropped from a kitchen selfie.” Output a single 1:1 square professional headshot, photoreal, identity-locked to the uploaded reference.
Rules the AI must follow:
- Aspect ratio 1:1 square, strict, locked at the start and the end of the prompt
- Identity preservation is the highest-priority constraint: match the uploaded reference’s bone structure, eye shape, nose, lips, hairline, proportions, and skin tone exactly; the person must be unmistakably recognizable
- Natural window-light look: soft directional daylight from camera-left, gentle highlight roll-off, no harsh overhead light, no ring-light flatness, no hard shadows under the eyes
- Realistic skin texture required: preserve visible pores, faint natural unevenness, light freckles or marks if present; no airbrushing, no porcelain smoothing, no glossy AI-plastic beauty filter
- Eye-level chest-up framing: no full-body, no extreme low or high angle, no phone-selfie close-up distortion
- Single image output: no contact sheet, no variant grid, no before/after split
- No text, captions, logos, or watermarks anywhere in the image
- Output the image directly without explaining the prompt back
- All text in English Latin script if any incidental signage appears
Replace these placeholders with your details:
{OUTFIT_STYLE}= a fine-knit navy sweater over a plain shirt collar, no tie{BACKGROUND_STYLE}= a clean light-grey wall softly out of focus behind you
Two slots are yours to swap, the outfit and the background, and the rest is the prompt holding the studio look. If you want this one already pre-baked with the same identity-lock and skin-texture rules, it lives in the Image Prompt Pack for $19.
What this costs versus the studio
Lay the three paths side by side and the trade is easy to see.
| Dimension | Photographer studio session | At-home phone only | At-home phone + the prompt |
|---|---|---|---|
| Cost | $304 US average ($216 to $427 range, Thumbtack 2025) | $0, gear you own | $19 one-time, the prompt pack |
| Time to a usable shot | Book, shoot, cull: usually a week | One afternoon | One afternoon plus a few minutes per render |
| Who fixes your chin and pose | A human director in the room | Nobody; you self-direct | Nobody; but the prompt locks the light, lens, and framing |
| Final “pro” finish | Yes, that’s what you’re paying for | Hit or miss; depends on your light and wall | Yes; the prompt supplies the look the phone can’t |
| Commercial-use license | Yours, usually | Yours | Yours; you made it, on your tool |
The studio buys you a director and a guaranteed finish for $304. The phone gets you most of the way for nothing. The $19 path closes the finish gap the phone can’t, and keeps the commercial-use license in your name. For the cost of one coffee instead of one studio booking, the first glance lands on the right side.
FAQ
Q: Can you do a professional headshot at home?
A: Yes. A studio headshot is buying four things: soft directional light, a clean backdrop, the right distance between your face and the lens, and a director who fixes your pose. Three of those are physics you can stage at home for free: face a window for soft side light, stand a few feet in front of a plain wall, and put your phone at eye level about five feet back on 2x or 3x zoom. The fourth, the polished studio finish, is the one gap a phone can’t fully close on its own, which is where an identity-locked AI prompt comes in.
Q: What is the average cost of a professional headshot?
A: According to Thumbtack’s 2025 price guide, the US average for a professional headshot session is $304, with most sessions falling between $216 and $427. HeadshotPro’s 2025 analysis of hundreds of photographer websites put the median closer to $250. Prices swing with your city, the photographer’s experience, session length, and how many retouched images you get back. Taking it at home with your phone costs nothing but your afternoon.
Q: What is the best color to wear for a headshot?
A: One solid mid-tone color that doesn’t fight your face for the glance. A calm navy, charcoal, or deep green reads professional and keeps the focus on you; loud prints, logos, and very bright or very pale colors pull the eye away. Which specific color flatters your skin tone and your field is its own question, answered in detail in our guide to what color to wear for a professional headshot.
Q: Can ChatGPT make me a professional headshot?
A: Yes, if you give it the right instructions. Upload one clear front-facing photo of yourself, then paste a prompt that does three things: it locks your face first so the result stays unmistakably you, it names the lighting and the lens so you get a studio look instead of a flat one, and it forces visible pores and natural skin texture back in so you don’t get the waxy AI-plastic finish. The prompt earlier in this piece does all three. Without those instructions, the default output tends to hand you a porcelain stranger who is almost, but not quite, you.
Key Takeaways
- A studio headshot fee is buying four variables, not talent: soft directional light, a clean backdrop, the right lens distance, and a director. Three are free at home.
- Thumbtack’s 2025 price guide puts the average US session at $304. The at-home phone version costs nothing, and the AI finish costs $19 one-time.
- The single most common selfie mistake is distance. A photo from twelve inches makes your nose look about 30 percent wider than one from five feet, per a 2018 JAMA Facial Plastic Surgery study. Step back and zoom.
- Light from a window beats light from a ceiling every time. Overhead bulbs dig shadows under your eyes; soft side daylight is the free version of a studio softbox.
- The phone gets you most of the way, but it can’t supply the studio finish alone. An identity-locked prompt that forces real skin texture closes the last gap without the wax-figure look.
The photo you don’t have to retake
Picture the viewer from the top of this piece, a few seconds on your profile. The old photo told them you didn’t think it mattered. The new one, made on a Saturday afternoon by a window in your own apartment, tells them the opposite, and it cost you an afternoon instead of $304 and a week.
So the real question was never whether you could afford the studio. It was whether you knew what the studio was actually selling. Now you do. What’s the photo currently doing the talking for you, and is it saying what you’d want it to in the glance you get? The full at-home prompt, with the same identity-lock and skin-texture rules already built in, is one of the career-portrait prompts in the Image Prompt Pack for $19.