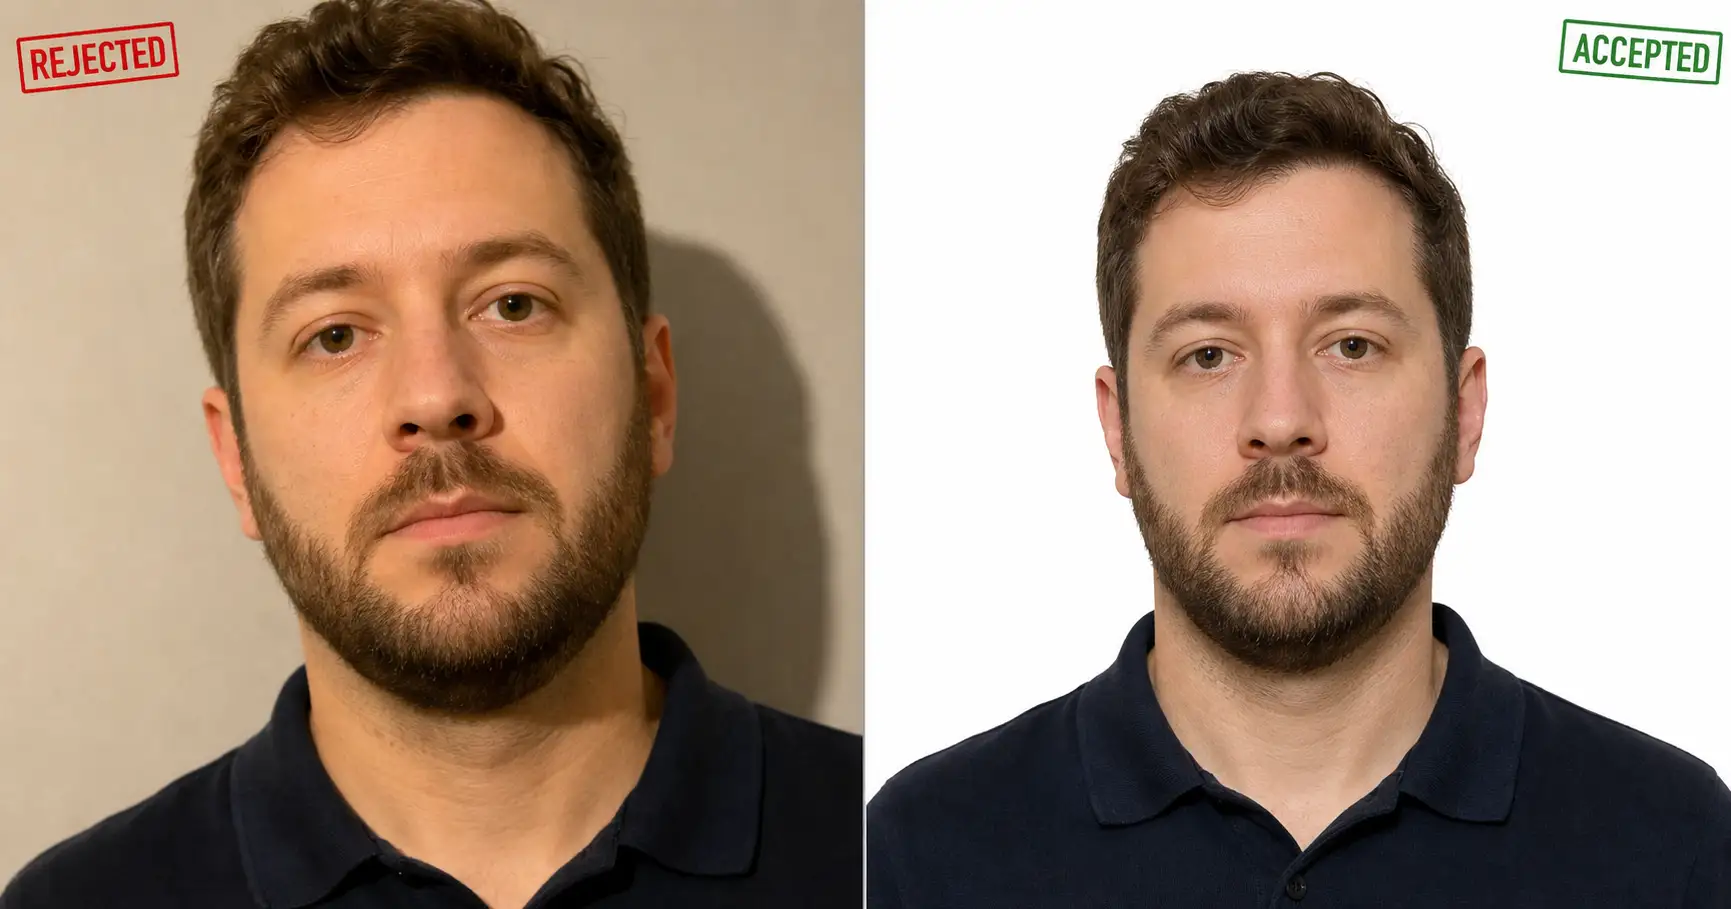
You can take a passport photo at home that the passport office will accept, and the only thing standing in your way is three numbers. Not talent, not a studio, not the clerk at the pharmacy counter. A passport photo gets rejected for one of three measurable reasons: the wrong size, a background that is shadowed or not plain, or a head that is the wrong size in the frame. Get those three right and a home photo passes exactly like a paid one.
Why passport photos get rejected
Outcomes are about what you get. Specs are about what you hand in. A passport photo is graded against a published spec, and the grader does not care whether a studio took it or you took it on a kitchen stool. That is the good news hiding inside the bad news: rejection is not a mystery, it is a checklist, and the checklist is short.
There are three lines on it. Size: the printed dimensions your country requires. Background: plain, uniform, light, no shadow. Head height: the distance from your chin to the top of your head, which has to land inside a narrow published window.
The third one is the quiet killer. Size you can measure with a ruler. A shadowed background you can see. Head height is invisible to the naked eye, which is exactly why it gets missed. The U.S. Department of State’s official photo guidance puts the head size at 1 to 1 3/8 inches (25 to 35 mm) from the bottom of the chin to the top of the head, and names the most common rejection cause outright: you stood too close to the camera, so your head came out too large. It also bans something newer. The State Department’s guidance says, in plain words, do not edit your photo with software, phone apps, filters, or artificial intelligence. The submitted file has to be an unaltered likeness.
Which means the home-photo problem was never “can I.” It is “do I hit the three specs my country publishes.”
How to take it at home, step by step
Four steps. The first three you control with where you stand and how you light yourself. The fourth is the one nobody does, and it is the one that saves you the trip back.
Step 1: Set the background and the light
Stand a foot or two in front of a plain, light, uniform wall. White is the safe default everywhere. Light yourself from the front, not from above, so no shadow falls on the wall behind your head. You’ll see: an evenly lit wall with no dark halo around you. The common pitfall: standing with your back against the wall, which throws a hard shadow exactly where the grader looks first.
Step 2: Fix the distance, which fixes the head size
Put the camera at eye level, several feet away, and zoom or crop in rather than stepping closer. Distance is what gets the head size right. You’ll see: your head and shoulders with clear space above your hair, not a face that fills the frame. The common pitfall: the front-facing selfie lens at arm’s length, which both oversizes the head (the State Department’s top rejection cause) and bows the features outward. Hand the phone to someone, or use a timer.
Step 3: Hold a neutral face
Look straight at the lens, both eyes open, mouth closed, no smile showing teeth. Most countries reject a grin. You’ll see: a calm, even expression facing the camera squarely. The common pitfall: a slight head tilt or a closed-mouth half-smile that creeps in across ten takes. Shoot a few; pick the flattest one.
Step 4: Check it against your country’s spec
You now have a clean file. The only thing left is to size it to the exact spec your country publishes, and that spec is the next section. Get these four right and the photo is a file that needs nothing but the correct dimensions.
Passport photo size requirements, by country
Here is the spec that actually decides acceptance, for eight of the most-applied-for countries, with the office that publishes each rule named.
| Country | Photo size | Head / face height (chin to crown) | Background | Set by |
|---|---|---|---|---|
| United States | 2 × 2 in (51 × 51 mm), square | 25–35 mm (1 to 1 3/8 in) | White or off-white | U.S. Department of State |
| United Kingdom | 35 × 45 mm, portrait | 29–34 mm | Plain light-coloured (cream or light grey) | HM Passport Office |
| Schengen / EU | 35 × 45 mm, portrait | 32–36 mm | Light grey or white | EU Visa Code (Reg. 810/2009) + ICAO |
| Canada | 50 × 70 mm, portrait | 31–36 mm (face) | Plain white | Immigration, Refugees and Citizenship Canada |
| Australia | 35 × 45 mm, portrait | 32–36 mm (face) | Plain, light, uniform | Australian Passport Office |
| China | 33 × 48 mm, portrait | 28–33 mm | White or off-white | Chinese visa application (COVA) |
| Japan | 35 × 45 mm, portrait | 32–36 mm | Plain light (white, light grey, or light blue) | Japan Ministry of Foreign Affairs |
| India | 35 × 45 mm, portrait (since Sept 2025) | 36–38 mm (face, ~80–85% of frame) | Plain white | Passport Seva / Ministry of External Affairs |
Two columns swing the most. Photo size splits into square (the United States, at 2×2 inches) versus portrait (everyone else here), so a US-sized print will not fit a UK or Schengen slot and the reverse fails too. Head height is the narrow window: the US allows 25 to 35 mm chin-to-crown, the UK’s HM Passport Office 29 to 34 mm, the Schengen area 32 to 36 mm per the EU Visa Code (Regulation 810/2009) and ICAO Doc 9303, and India now wants the face filling 36 to 38 mm. India is the one that recently moved. Passport Seva switched to the ICAO 35×45 mm portrait format on September 1, 2025, retiring the old 51×51 mm square for ordinary passports, so older instructions you find online are now wrong for India.
Find your row, hold those three numbers, and the only remaining question is how to produce the photo at the right size.
The at-home photo, done with AI
If the head-size window or the pure-white background keeps defeating your phone, you can have an AI image tool build a spec-compliant photo from a single selfie. Upload one clear front-facing photo of yourself, paste the block below into ChatGPT (or Claude or Gemini), and swap two lines for your country and its photo ratio.
Show the full promptTap to expand
Paste this into your AI (ChatGPT, Claude, Gemini, or any image tool).
REQUIRED upload before pasting: one clear, well-lit, front-facing photo of your face — this is the face the AI keeps; without it the photo will not be you.
Then swap two lines: {COUNTRY} for your country, and {RATIO} for that country’s photo ratio (the per-country list is below the rules).
Generate this image:
A single ultra-realistic {RATIO} passport-size photo of the person from the uploaded reference image, with exact face likeness — match the bone structure, eyes, nose, lips, hair, and skin tone exactly, no beautification, no age adjustment, no slimming. This photo is for {COUNTRY} passport, visa, or national ID submission and must follow that country’s biometric spec. The person is centered horizontally, head and shoulders only, with the head from the top of the head to the chin occupying 70 to 80 percent of the vertical frame height and clear space above the hair, shoulders included at the bottom and not cropped. The background is pure white #FFFFFF, completely uniform, with no gradient, no shadow on the face, and no shadow on the background. Lighting is even, diffuse, studio-style soft frontal light, with no harsh shadow and no rim light, at moderate contrast for biometric legibility. The person wears a plain dark top with the collar visible at the bottom of the frame, no patterns, no logos, no visible jewelry. The expression is neutral, mouth closed, no smile, no teeth, both eyes open and looking straight at the camera. Skin shows realistic natural texture: visible pores, faint skin micro-detail, slight micro-asymmetry, no plastic smoothing. Camera: 85mm-equivalent lens at f/8, ISO 100, eye-level, no perspective distortion. Single {RATIO} passport photo, head-and-shoulders, pure white background, biometric-spec compliant.
Rules the AI must follow:
- Aspect ratio {RATIO}: strict, locked at the start and the end of the prompt
- Identity preservation is the highest-priority constraint: match the uploaded reference photo’s face, bone structure, eyes, nose, lips, hair, and skin tone exactly; no facial changes, no beautification, no age adjustment, no slimming
- Background must be pure white #FFFFFF, completely uniform: no gradient, no texture, no shadow on the face, no shadow on the background
- Neutral expression required: mouth closed, no smile, no teeth visible, both eyes open and looking straight at the camera
- No glasses, no hat, no head covering, no hair across the face or eyebrows; shoulders included at the bottom of the frame and not cropped
- Realistic natural skin texture required: visible pores, faint freckles or skin micro-detail, slight micro-asymmetry; no porcelain skin, no AI-plastic smoothing
- Single image output: no contact sheet, no variant grid, no before/after split, no multiple angles in one frame
- Output the image directly without explaining the prompt back
Replace these placeholders with your details:
{COUNTRY}= United States (or pick yours from the list below){RATIO}= 1:1 square, for US 2×2 inch (or pick the ratio matching your country, below)
Bonus tips.
- Match
{COUNTRY}and{RATIO}together: United States → “United States” / “1:1 square (2×2 inch)”; Schengen / EU → “Schengen-area European country” / “7:9 portrait (35×45mm)”; United Kingdom → “United Kingdom” / “7:9 portrait (35×45mm)”; Canada → “Canada” / “5:7 portrait (50×70mm)”; Australia → “Australia” / “7:9 portrait (35×45mm)”; Japan → “Japan” / “7:9 portrait (35×45mm)”; China → “People’s Republic of China” / “11:16 portrait (33×48mm)”; India → “India” / “7:9 portrait (35×45mm)”. - Strict-ear countries (Schengen, Japan, China): add “both ears must be visible, do not cover the ears with hair.”
- Religious head covering (hijab, turban, kippah): add “the head covering is allowed, but the full face from forehead to chin and both cheeks must remain completely uncovered and clearly visible.”
- Light-blue-background IDs (some Japan domestic, some UK driving documents): replace “pure white #FFFFFF” with “light blue #C5D8E8, completely uniform, no gradient” in both the prompt body and the background rule.
- Output looks too smooth or plastic: add “very visible natural skin texture, pronounced pores, completely unretouched, no beautification” — over-smoothed skin is a common rejection cause, not a wrong ratio.
One rule has to stay loud here. The point of the AI render is to hit the spec, not to beautify you. The U.S. Department of State bans software- and AI-altered submissions by name, and the practical version of that ban is this: the photo has to read as an unedited likeness of you, today. The single most common way an AI photo fails is over-smoothed, plastic-looking skin, which a grader reads as “altered” on sight. The prompt above forces visible pores and natural skin texture for exactly this reason. The deeper mechanism behind why AI photos drift into that waxy look, and how to defeat it, is the whole subject of our anti-plastic method piece and the pillar on why AI images look fake. A passport photo is the strictest test of it there is, because here the grader is paid to catch the tell.
If you also need a polished headshot rather than a regulation ID photo, the same identity-lock approach drives our guide to building a headshot from a single photo. Same engine, gentler light, a different job.
A short detour from the article: the Independent Brand Visual Kit is the free pack we hand new subscribers. Twelve copy-ready AI image prompts, including the passport and ID photo prompt above. The kit arrives the moment you subscribe, plus one paste-ready AI move a week after that. The kind you can use on a Tuesday or a Sunday.
Whichever way you produce the photo, phone or AI, the last move is the same: run it through your country’s free official checker before you submit.
Before you submit: the 30-second self-check
The whole article, compressed into the check you run before you hand the photo in.
That check is the difference between an accepted photo and a lost week.
FAQ
Q: Can I take my own passport photo at home?
A: Yes. There is no rule that a passport photo has to be taken by a professional or at a store counter. The passport office checks the photo against a published spec, not against who shot it. Get three things right and a home photo is accepted exactly like a counter photo: the photo size your country requires, a plain uniform background (pure white is the safe default), and your head sized to the chin-to-crown range your country publishes. Then run the file through your country’s free official photo checker before you submit.
Q: What size should a passport photo be?
A: It depends on the country. The United States uses 2 by 2 inches (51 by 51 mm), square. The United Kingdom, the Schengen area, Australia, Japan, and India use 35 by 45 mm, portrait. Canada uses 50 by 70 mm. China uses 33 by 48 mm. The size is published by each country’s passport authority and the eight most-applied-for sizes are in the table in this article. Matching the size is the easy part. Matching the head-height range inside it is what trips people up.
Q: What background do you need for a passport photo?
A: A plain, uniform, light background with no shadow, no pattern, and no objects behind you. Pure white is accepted everywhere and is the safest choice. The UK, the Schengen area, and Japan also accept light grey. Canada and India require plain white specifically. The single most common background mistake is a shadow cast on the wall behind your head, which happens when you stand too close to it. Stand a foot or two away from the wall and light yourself from the front.
Q: Why do passport photos get rejected?
A: Almost always for one of three measurable reasons: the photo is the wrong size, the background is shadowed or not plain, or your head is the wrong size in the frame. The U.S. Department of State names being too close to the camera, which makes the head too large, as the most common rejection cause. Head height is the spec nobody measures because it is invisible to the eye. Every country publishes a chin-to-crown range in millimeters, and missing it is what sends the photo back.
Q: Can you use a phone for a passport photo?
A: Yes, a modern phone camera has more than enough resolution. The catch is not the camera, it is the framing and the background. Hold the phone at eye level, stand a few feet from a plain light wall so your head is not oversized and the wall is not shadowed, and avoid the front-facing selfie lens, which distorts the face at close range. Have someone else take it, or use a timer and a small tripod. Then size the result to your country’s exact spec.
Key Takeaways
- A passport photo is graded against a published spec, not against who took it. A home photo that hits the spec is accepted exactly like a paid one.
- Rejection is almost always one of three measurable things: wrong size, a shadowed or non-plain background, or the wrong head height. The U.S. Department of State names “too close to the camera” as the most common cause.
- Head height (chin to crown) is the spec nobody measures because it is invisible to the eye. Every country publishes a millimeter range; the verified eight-country table gives you yours.
- Photo size is per country. The US is 2×2 inches square; the UK, Schengen, Australia, Japan, and India are 35×45 mm; Canada is 50×70 mm; China is 33×48 mm.
- Whatever produced the photo, including AI, the final file must read as an unedited likeness, and you should run it through your country’s free official checker before submitting.
The counter you didn’t drive to
Picture the version of this that goes wrong. The photo comes back from the passport office the week before the trip, no real explanation, just a rejection and a form to redo. You never see what was wrong, because the thing that was wrong was a head two millimeters too tall in the frame.
Now picture the version that works. You shot it on a kitchen stool against a white wall, sized it to your country’s row in the table, ran it through the official checker, and it cleared on the first try. Same photo, three numbers apart.
Which three numbers are yours? Find your row, hit the size, the background, and the head height, and let the spec do the work the counter clerk would have charged you for. The passport and ID prompt is one of the career-photo prompts in the Image Prompt Pack for $19.